TCL 55E17NUS TV – ADB, Root, Upgrades and Bloatware
JULY 2018
If you're looking to root your TCL 55E17NUS, TCL's 55" 4K Android TV variant released in New Zealand, you may have noticed the lack of modding information available for the model or the 65" 65E17NUS variant. While TCL sells multiple variants of this TV worldwide, and some are well documented on websites like XDA, the ANZ models are not so lucky.
Thankfully the ANZ 55E17NUS does seem to share certain similarities with other TCL Android TV models like the European U55P6046 and Indian L55P2MUS, and after some quality time on Google Translate, plus some trial and error, I've collated the information below and enabled root on my 55E17NUS.
If you're looking to enable root, the Android Development Bridge (ADB) or remove the locked-in bloatware, you may find this information useful. Though it should be noted this information is not valid for the US Roku TV model which does not run Android TV.
Service Codes
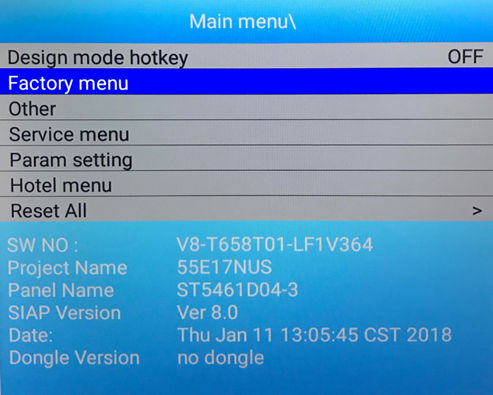
The 55E17NUS has a series of service menus accessible by entering the right combination of codes via the remote control. These menus sit outside the Android environment and provide access and information not normally available within Android TV. To enter these codes, first enter the Settings menu by hitting the cog icon on the remote control. Select Picture then Advanced Settings and then highlight Contrast. While Contrast is highlighted, enter one of the service codes below using the remote:
9705 - Service Menu
9735 - Factory Menu
1950 - Engineering Mode
Shortly after entering the code, the selected menu will appear:
Enabling ADB
The 55E17NUS seems to disable both wireless and USB ADB modes by default, but wireless ADB can be enabled by following these steps:
1. Ensure you have a copy of ADB installed on your machine which can be found here.
2. Unlock the hidden developer menu in Android by following the steps here.
3. Enable ADB debugging using the unlocked developer menu.
4. Enter the 1950 engineering menu by following the service code section above.
5. Highlight Other then press OK on the remote.
6. Highlight ADB then press the right arrow key on the remote.
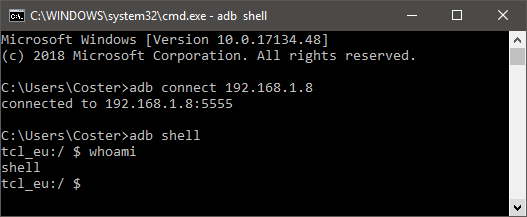
You should then be able to make a wireless ADB connection to the 55E17NUS after accepting the request on TV:
Originally, I attempted to connect to ADB over USB using a non-compliant, straight-through USB-A to USB-A cable after enabling USB debugging. That didn't work, and device manager quickly threw up a malfunctioning device error when I tried. However, Windows will recognise the TV over USB when in bootloader mode. Since the bootloader doesn't support wireless access, you'll need to make or buy a USB-A to USB-A cable if you want to root your device using the method outlined below.
Once you've finished with ADB, remember to disable it.
Upgrading
Depending on the version of Android TV your 55E17NUS ships with, you may want to upgrade to the latest version of Android that TCL provides. At the time of writing this, the OTA upgrade option in the settings menu doesn't show the latest version, v364 Android N, so a manual upgrade is required. Version 364 contains worthwhile performance improvements and is a major version bump taking the 55E17NUS from Android M to N.
To upgrade, you'll need a copy of the signed TCL Android N upgrade package found here.
1. Save Update_sign.pkg to a FAT32 formatted USB drive.
2. Turn the TV off at the wall.
3. Insert the USB drive into the top USB port found on the side of the TV (service port).
4. Press and hold the power button found below the TCL logo.
5. Turn the TV on at the wall while still holding the power button.
6. After about 10 seconds you should see the upgrade process start on the TV. Let go of the power button.
7. Once the upgrade finishes, follow the service-code section above to enter the 9735 Factory Menu.
8. While in the menu, highlight RESET SHOP and press the right allow key on the remote.
Once the TV finishes restarting, the upgrade process is complete. Your 55E17NUS should now be running Android N.
Establishing Root
The 55E17NUS can be rooted by flashing a pre-patched TCL boot image generated by the Magisk root tool. You can create your own image by dumping the stock bootloader from the 55E17NUS and then patching the exported image with Magisk Manager on another Android device. Alternatively, you can use a pre-patched image created by a user on the on the 4pda forums, cuchma. The image is for the TCL P6046, but it works on the 55E17NUS upgraded to Android N v364.
With ADB access enabled, connect to the TV with your USB-A to USB-A cable and enter these commands:
adb reboot bootloader
fastboot devices
fastboot flash boot <PATH TO PATCHED IMG>.img
fastboot reboot
Once the TV finishes rebooting, install the Magisk Manager companion app and configure your root settings.
Bloatware Removal
The 55E17NUS ships with its fair share of bloatware installed, but thankfully most of it can be easily disabled using the Apps menu found in Settings. However, if you're looking to completely remove these applications from the TV, you can run the ADB commands below with root. Remember to download a backup copy of the APKs before deleting them from the TV.
adb connect <TV IP>
adb shell
su
mount -o rw,remount /system
rm -rf /system/app/<BLOAT>.apk
mount -o ro,remount /system
I found I was able to disable the pinned, third-party apps on the home screen without issue including YuppTV, IQQI, Asphalt and the TV4 app store. If you find the app icon remains present on the home screen after a reboot, the icon is probably defined in TCL's partner customiser app (see below) so you'll need to remove it there.
Home Screen Customisation
Google's Leanback is the default launcher on the 55E17NUS, and TCL doesn't provide a lot of options to customise it out of the box. However, by default Leanback looks for a 'partner customiser' app which allows OEMs, like TCL, to customise the home screen to their choosing. By default, TCL's partner customiser APK is stored in /system/priv-app/LeanbackCustomizer/.
If you're familiar with building Android applications, you can take advantage of this to customise the default layout by building your own customiser app. Start with a copy of Google's Partner Customiser code from Google's repository found here. Once you have completed your customisations and complied an APK, push it to /system/priv-app/LeanbackCustomizer/ after backing up the original from the 55E17NUS.
Strange Decisions
TCL has made some interesting configuration choices for the 55E17NUS. By default, there is a web server listening on TCP port 7983, and by connecting to that port using your web browser, you will see a directory listing of the TV's internal disk which is rather unusual:
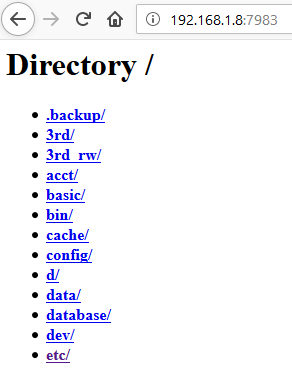
It's not uncommon for Android TV apps, like Netflix, to run internal web servers to handle casting and media functionality, but listing out the contents of the TV's internal disk without authentication is not excellent. Provided you are on the same network as the TV, you'll be able to remotely read the content of any attached USB disks or copy internal configuration files from the TV freely.